Safety DayLights™ Smart Controller
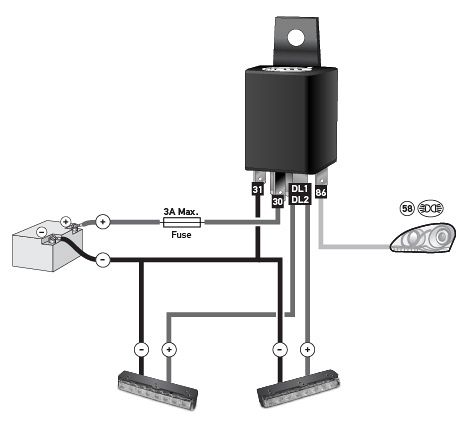
This smart controller is designed to simplify the installation of HELLA’s LED Safety DayLights™ range by eliminating the need to wire the lamp, or changeover relay to ignition terminal 15.
The Safety DayLights™ Smart Controller can be wired directly to the positive terminal of the battery, which saves the difficult and often time consuming task of finding the ignition feed.
The smart controller monitors the voltage supply from the battery and will automatically switch the Safety DayLights™ on when the engine is started, and automatically switch them off when the headlamps are activated, or the engine is turned off.
Advanced version P/N 5DF 980 818-011 has vibration monitor for installation in vehicles with fuel saving alternators.
• One smart controller controls two lamps
• Quick and easy installation
To find a HELLA reseller near you, click here.
Rollover/tap the icons below for further details:

Multivolt™
Multivolt™ for optimum performance in 12 and 24 volt systems.

Made in New Zealand
Options
Specifications
Voltage |
Multivolt™, suitable for 12 and 24 volt systems. |
||||||||||
Maximum |
20W |
||||||||||
To Suit |
HELLA LED Safety DayLights™ range. |
||||||||||
Features |
Safety DayLights™ OFF delay of approximately 10 seconds. |
||||||||||
Wiring Specifications |
|
Outline

P/N 3090 (Vibration Monitor - Multivolt™) - P/N 3091 (Multivolt™)

Documents
| Document | File Name | File Size |
|---|---|---|
| 5DF 980 818-00x_Instruc_3091_3091-BULK_SDL-Smart_Controllr.pdf | 660.96 KB | |
| 5DF 980 818-0xx_3090_3090-BULK_Smart_Controller_Advanced-Multivolt.pdf | 691.82 KB |


